Thursday, September 27, 2012

Preview - New details pane when reviewing changes (Eclipse & VS clients)

In certain situations, seeing all the combined changes from the various change sets doesn't give a clear picture. The reviewer may want to understand which individual change sets modified the file MobileWebView.java. Simply turn on the 'Show details pane' option under the Change Summary's drop down menu. This brings up the Details pane shown below.


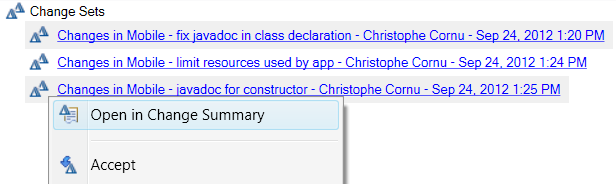
 In our example, the file MobileView.java was modified by all three change sets created by Christophe. Each change set's comment is available, which can help understand the purpose of each change set. Dependency graph shows the ordering of the change sets and the reviewer can double click on each row to inspect each change individually, gaining a progressive idea of how the whole bug was fixed.

Note. Expect to be able to try out this new feature with 4.0.1 M4. As we are transitioning toward feature teams and continuous delivery, I am experimenting with previewing our latest work on this non official blog. Go to jazz.net for the latest milestone build and official new and noteworthy. There is no guarantee a preview will make it to a stable build.

Preview - New dedicated Change Summary view for reviewing change sets (Eclipse & VS clients)

Once a bug is fixed, a good practice is to ask one of your peers to review your changes. Ping them on the work item you have resolved or set an approval. The reviewer will be notified and will open the associated change sets.


The reviewer can then go through every file that was modified and open a compare editor showing the combined changes for that file.


In the above example, the reviewer selected the file MobileWebView.java and double clicked (or right clicked and selected the action 'Open in Compare Editor'). This brings up a compare editor that shows how the selected change sets combine to modify that file.


Note. The Change Summary view should look familiar since it is drawn from the previous Change Explorer in the 'Show Files' mode. The previous Change Explorer view supported two modes, one focused on file changes 'Show files' mode and one focused on comparing sources such as streams and workspaces 'Show change sets' mode. In 4.0.1, the 'Show files' mode is evolving with richer capabilities such as the Details pane and is moved to a separate new view named 'Change Summary'.

WorkflowView used in 4.0.1View used in previous releases <= v4.0Artifacts shown
Review change setsChange SummaryChange Explorer in 'Show files' modefiles and folders affected by selected change sets
Compare workspaces, streams, snapshots or baselinesChange ExplorerChange Explorer in 'Show change sets' modeChange sets (e.g. change sets from source stream that aren't in target stream and vice versa)


Note. Expect to be able to try out this new feature with 4.0.1 M4. As we are transitioning toward feature teams and continuous delivery, I am experimenting with previewing our latest work on this non official blog. Go to jazz.net for the latest milestone build and official new and noteworthy. There is no guarantee a preview will make it to a stable build.

Preview - Choose which change sets to review or accept from a work item (VS Client)

The Work Item editor in the Visual Studio client now lets you select the associated change sets you want to open or accept (Press CTRL key and mouse click over the selected change set triangle icon and repeat as desired).


Note. Expect to be able to try out this new feature with 4.0.1 M4. As we are transitioning toward feature teams and continuous delivery, I am experimenting with previewing our latest work on this non official blog. Go to jazz.net for the latest milestone build and official new and noteworthy. There is no guarantee a preview will make it to a stable build.

Thursday, September 20, 2012

Change set under the microscope

RTC Source Control users deal with hundreds or thousands of change sets every day. Let's stop a bit here and have a look at what a change set looks like under a microscope.

Change sets are everywhere. Wherever you put your microscope inside SCM, you'll quickly find them under the cover.
  • In the Work Item editor, as links to the code that was modified to fix that work item.
  • In the Pending Changes view, as the currency you exchange with your team to collaborate
  • In the History view of your workspace or of your team stream, nicely sequentially organized
  • In the Build Results page, showing you what happened to the code since the previous build
  • In a Source Editor, when using the annotate feature
Under the naked eye, this is how a change set looks like, an innocent blue triangle:

When you create a change set, it remembers you for ever. So anyone who finds this change set will know its author. It also knows the date and time related to its creation.

A change set describes its purpose with a comment. It describes its mission with a bi-directional link to a work item. So you can trace back why that change set is there and who approved it, give feedback.

A change set is tied to a component. If you have permission to see the component, you can see the change set. Otherwise you won't. A change set is designed to flow between workspaces and streams, within the same RTC server or between different RTC servers.

A change set knows who it is. It is different from all the other change sets out there in the world. It's important because that is how RTC Source Control is a modern distributed SCM. A change set has a unique ID. We'll never mix your change set with mine, even if we are on different servers.

Now it's time to zoom into the core of a change set. Until now, we were just looking at its outer shell... A change set holds an immutable list of files and folders, with their expected starting state (required to apply the change set) and final state (after the change set is applied). It's immutable once its author decided to seal it (by completing or delivering it). The change set will forever describe how to take a set of resources from a particular state to another particular state.

There are things you won't see in the change set itself. Content of the files changed in the change set isn't part of it. You see, the change set is designed to be a very lean entity so you can scale huge histories of change sets and not hurt the database. Change set only contains the IDs that identify the starting states and final states of the files and folders modified. The content corresponding to these states is efficiently stored once in the DB (keyed with a hash). A change set is a bunch of ID's, not a huge text patch.

Another thing you won't see is path names. The change set stores the name of the files and folders that are modified (or moved, renamed..). But being efficient and portable, it stores only the ID of the parent folder of these modified items. No lengthy path name. Change set describes a change in a mathematically accurate manner (IDs). Of course humans will need to see path strings at some point e.g. src/com/my/project/A.txt. The UI resolves these paths when needed in the context (configuration) in which the change set is used (your workspace, a stream, etc.). For most SCM operations, only IDs matter. IDs are reliable and efficient (and unique). Paths are only useful when a reviewer is looking at the change set.

Sometimes a bacteria runs into another bacteria and consumes it. Some change sets are the result of merging change sets. For each file or folder merged, the change set tracks the starting state, the merge state(s) and the final (merged) state. So a change set knows it represents a merge between conflicting states and the UI can specially decorate it to get user's special attention (hey, did my team mate override my change?).

And this allows SCM to show the following merge graph. It displays the relationship of the states in the change sets forming the history of a file in a particular stream or workspace.


At that point, we've used a regular magnification. But we can push further, though beware most users usually don't get in there. A change set also knows a lot about how its author got to that final state for each file or folder it modifies. In the early stages of a change set, its author checks-in local changes he or she made to files and folders. The same file may be modified and checked-in many times into that same change set. The last check-in will define the final version - the one that will be applied with the change set. But the change set also remembers somewhere very deep each intermediate version that was checked-in before it was sealed. Since 4.0, these versions are available to the user through the File History View / Check-in History pane.


That's how far we will take our journey inside a change set today. It's the building block of SCM, and a pretty solid one.


Friday, August 31, 2012

Back to school with RTC Source Control 4.0 videos

It's almost september. Quickly catch up on some of the latest SCM features we added in version 4.0 (also known as CLM 2012)...

Note these videos support HD (high definition), they are best enjoyed full screen and with the youtube player's video quality changed to 720 (HD).

1. RTC Shell - easily share documents and collaborate with your RTC team from within the familiar Windows Explorer. There are certainly members in your team who will appreciate using a lightweight client instead of a full IDE.


2. Locate change sets - When work items and source control play together, it becomes so easy to figure out which bugs you need to backport. Beware, that feature will greatly simplify your life when dealing with multiple streams. It plays the natural strength of RTC - team artifacts are connected and integrated with each other. That's a feature the SCM dev team uses very frequently itself.


3. Item read permissions - Control who can access specific files and folders within a component. Perfect if you work with third parties and consultants who need deep yet controlled access to your data.


4. File Content Delete - RTC administrators, learn how you can permanently purge unwanted content from an RTC server. Physically remove the bytes of an unwanted document, from wherever it is referenced in the database.


If you know about other videos related to new SCM 4.0 features, please add a comment and a link below. Thanks!

Thursday, August 30, 2012

hacking the jazz.net website using the scm command line

Recently, I switched to running Linux on my laptop.   With this change, I am provided with an opportunity to change the way that I work with RTC.  For the past year, I have been self hosting on the RTC Windows Shell Integration whenever I have needed to deal with documents or files that are not better housed in an IDE (like Eclipse).  But there is no Lightweight RTC Shell on Linux (and one is not yet currently planned).

I am always looking for opportunities to self host more on the RTC SCM command line tool[1].  It has come a fair way over the past couple of years, but since we do Eclipse development so much, it is too easy to fallback on the eclipse client.  I don't really hack much code these days, and I do spend more time writing documents, articles and presentations, so using the CLI to further these endeavours is the way to go.

Setting up my new sandbox for jazz.net tonight, I discovered that there are things that I can do better in the command line.

For example, for a truly large component, like the Jazz.net website, I can programmatically list remote files and grep in order to find exactly the directory I want to load.

lscm ls rf -r repoNickName 1109 1111 /my/directory --depth - | grep uniqueFolderName

where 1109 is a CLI alias for the workspace I am using, and 1111 is the alias for the component.  These aliases are discovered through other queries like "ls comp" or "ls ws" which serve as ways to query and find artifacts in the repository to work against.

Then the load command looks like:
lscm load 1109 MyComponent/my/directory/some/other/path/uniqueFolderName
You can do the same thing when loading in Eclipse, but people often do not choose to navigate through the wizard.  I find that you think differently when using console tools than you do when you use graphical user interfaces.

For one thing, with a command line tool, the onus is on the developer to find ways to optimize their environment more.   Using aliases and writing scripts are two examples of how you can easily customize the way you interact with the system.

Additionally, command line users actually read the help.  All it takes is one type-oh, and as a command line user, you are reading help, or in the very least skimming it.  I can't remember the last time I used help in an Eclipse-based product.

I hope that if you want to try something different when you are working against a filebase which does not endorse a particular IDE or toolchain you will consider the SCM Command Line.  We have numerous articles[2] which are helpful for getting started.

[1] Today I raised this bug on the help : self hosting in action!

[2] Here are some articles.


Sunday, August 5, 2012

Spice up your pending changes view

When you're in a hurry, fast food is convenient. But after a while, you're going to get tired of the limited choice between ketchup and mayo for the dressing. Same thing goes with RTC Source Control. By default, it comes with certain preferences that work well in common situations and will get you started quickly. But once you use the tool extensively, it's time to explore some of the ways you can customize its UI to fit your taste. Here we will focus on the Pending Changes view. We will assume you are familiar with that view and its typical workflows (check-in, accept, deliver...). The view offers you plenty of flavors to choose from...

Auto check-in or not auto check-in?


By default, you have to manually check-in your local changes. Edit a file, save it. A local change shows up in the Pending Changes view. Select it and check it in. That's probably the way you've been working from day 1. There's an alternative way that works really well for certain users. Go to Eclipse > Window > Preferences > Team > Jazz Source Control > Changes > Check-in Policies. Check the Auto check-in local changes option and don't worry about the other options on that page. That's it, you're set. As long as you are logged in, every time you edit and save a local file, the new version gets automatically checked-in. Convenient. Try it and see if you like it. In our experience, some people prefer to drive manual, this is up to you...

Verbose or not verbose?


To help you decide if you are ready to accept or deliver a change set, Pending Changes view shows you various properties related to that change set - the person who created that change set, when it was delivered, files that were added, deleted, renamed, etc. Some users love details. Others prefer a view with no clutter. Turn on or turn off what you want in Eclipse > Window > Preferences > Team > Jazz Source Control > Changes > Label Decorations.

Eclipse compare editor or third party compare editor?


Before accepting or delivering changes, you double click and inspect them in a compare editor. By default, we use the built-in Eclipse compare editor. But there are other options out there in the market, and we know some are very popular. So we make it easy for you to plug in your own compare editor. Use Eclipse > Window > Preferences > Team > Jazz Source Control >  External Compare Tools.
The tool comes with predefined settings for some popular third party compare editors. If yours isn't listed, you can manually specify the arguments it requires from Source Control.

These are in my opinion some of the most useful ways you can tweak your Pending Changes view. If you're a big fan of some other options not listed here, please add a comment and explain how it makes your life easier...